Search This Blog

Wednesday, May 2, 2012

WILD STRAWBERRIES FOR FREE

Finally lovely day!!! Sun is slowly going down...
I was looking forward one (at least) of those days, so I could do some work in garden.
Last year I planted some wild strawberries (known as alpine strawberries) which I brought with me from Austria. This year they spread quite a lot and this makes big problem for me, because in the place where we live at the moment space is very limited and I won’t ha ve even enough hanging baskets for that amount of plants.
If any of you would like to give them home (and look after them) I will give some of them for free.  I think I will have something between 100-200 plants to give away.   They are small at the moment, but some of them have blossoms and they will spread again very quickly.  


They need just some space, sunny, snail-free place and water time to time.  If you don’t want the plant-louses on them in the future, good idea is stick  3-5 garlic cloves around the plants.  Fruits are nice and sweet (if they get enough sunlight) and they are just perfect for kids.  Daniel loved to picked them himself last year and he had great fun looking for rape ones...
At the moment I have 30 plants ready to go in little ‘pots’ made of kitchen roll.  They are dissolvable, so you can just put them into bigger pot as they are.
These plants got 4-5 natural treatments already against plant-louses (chemical  free). Other plants which are still growing in the old place got two treatments and another 2-3 will be given when they will be taken out.
Anyone who may be interested to get some of these plants, please contact me on my e-mail: karolina.laser@gmail.com (collection only)
If someone have some spare pots from plants (any type) and is not using it, I’ll be more than happy to help to get rid of them :) .

Thursday, April 26, 2012

BIRTHDAY CAKE

Most of the parents will agree with me, that there is not many things which give more joy than seeing their happy kids...
Today our Firstborn – Daniel is two years old.
For that special occasion together with Thomas we decided to make Tractor-Cake.  Who knows Daniel, can confirm, that he is absolutely mad about those vehicles...

Cake itself was made of chocolate sponge and banana cream (for grass we used green food colouring).  Tractor (also made of sponge) we covered with marzipan (as we are not big fans of icing).
Quite long time I was looking for good receipt for chocolate sponge – fluffy and moist at the same time...  Finally I found the one:

8 eggs
150 g plain flour
150 g sugar
2 teaspoons corn or potato starge
Pinch of salt
Lemon jest (out of 1 lemon)
2 table spoons coco powder (if you want more rich and darker you can put even up to 8 teable spoons coco powder).
1 teaspoon baking powder

Preheat the oven to 180°C.
Whisk the eggs, sugar, salt and lemon jest in a mixing bowl. Butter the mold you want to use and dust it off with plain flour. Start weighing out your other ingredients while the egg mix is whisking. When done this the egg mix should be ready and have a stiff consistency, so when you take out the whisk there should be a hole in the middle. Sieve all dry ingredients, so there be no lumps. Fold the dry ingredients slowly with a rubber spatula under the egg mix. Doesn’t matter if it isn’t completely mixed, because it will sort itself by pouring into the mold and spreading it out. Pour the mix in the ready mould, spread it evenly and put into the preheated oven on the middle shelve. Depending on the depth of the mould, the sponge will take appr. 20 to 30 min.

This is the result of our work:


And this is Daniel’s reaction when he saw the cake – for us absolutely priceless...


Sunday, April 15, 2012

Home pharmacy - cough syrup

Today something from my Granny’s ‘Home Pharmacy’.

This post should be especially interesting for those who like natural medicine and mums with small kids.

This cough syrup can be used by everyone – including toddlers.
It is very easy to make.

All you need is:
-          Dandelions flowers
-          Sugar
-          Glass jar

Most challenging is picking the flowers.  You need to find a good amount of them.  
The best if you find field, where farmers don’t put any fertilizer.  Most secure are those sides which are not used.  Good sign is when you see honey bees flying around.
When picking, make sure there is no small flies in the flowers itself.  You can easily shake flower to get rid of them.  Also remember to pick only flowers without stems.


Wash the flowers in a bowl of cold water. You can give them a gentle ‘wash’.


Put a layer of flowers first and then cover it with a layer of sugar.  Repeat it few times.


Press down everything using e.g. rolling pin.


Fill it up with more layers – as many as fit in jar.  
Make sure everything will be well pressed down.  At the very top should be a layer of sugar.  Close jar and put it in a sunny and warm place.  Leave it for about 4 weeks.


After that time flowers should come up and sugar should be dissolved. 
When syrup is ready, you can strain it and put it to small bottles or glasses.  
Store it in cool place. 

Saturday, April 14, 2012

How to make hanging flower pots (PART 1)

It is this time of the year, when those of you who have gardens, are quite busy...

I presume not all of you have huge garden where you have unlimited space for plants...

In the house we are renting, there is bit space for growing things, but unfortunately we don’t have much ‘sunny’ places...  This may cause some difficulties...  Another problem I have is just simply lack of pots and amazing amount of snails, which eat everything what is  on the ground (except herbs)...  I was very upset, when last year they made breakfast of my cucumbers,  courgettes and spinach...

I have two lovely little kids, so I can’t use anything against snails, and crushed egg shell doesn’t seem to be working that good...

Because of the snails, and limited space, I decided to plant strawberries in hanging baskets (you can find them on e-bay).  I was considering buying them, but making something like that by myself always gives me lot of satisfaction.

So today I will show you how to make those kind of baskets. 
The biggest advantage of them is, that you can hang them outside on the wall – so you are not losing any space in the garden or patio.  Probably they won’t prevent plants from snails a 100%, but it will definitely limit the amount of them, so plants will have much more chance to survive.

The whole procedure involves work with sharp equipment and fire,so  it should be made only by adults or under adult’s supervision.  

This is what you will need:

-          Empty bag after turf/coal  or any similar type
-          Sawing machine or if you don’t have one a needle and thread
-          Scissors
-          Pen or marker
-          Candle or tealight


1.   Take the bag, rinse it and dry it.  
You don’t  really want any dust etc. ,when you will be working.


2.   Put it on a flat surface (table), flatten it and bend it in half lengthwise.


3.   Using pen or marker draw three lines – one in the middle and two on the sides – about 4 cm from the middle one.


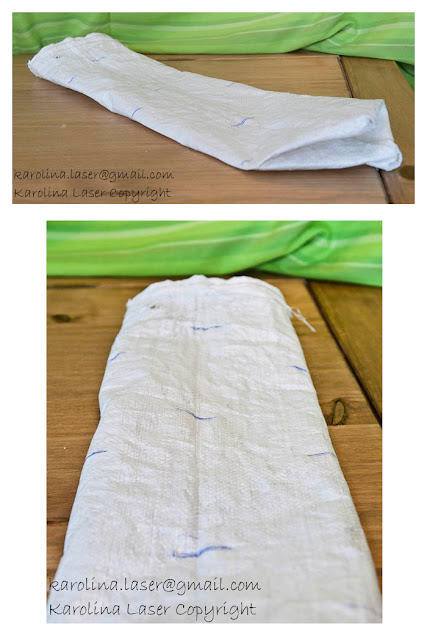
4.   Saw bags along two side lines.  I would recommend to saw twice with two slightly different stitches.  As you can see on the pictures I used two different colours, so you can see easily how it’s done, however normally I would use just one colour – doesn’t matter which one – stitches won’t be visible anyway.


5.  Cut the bag along the middle line.  Now you have two narrow hanging bags.


6.To prevent the cut edges from ripping, use a candle or tea light to melt the edges.  If you can, do it in garden shed or outside.  Make sure you will keep fire safety and don’t burn yourself.  Melting plastic can be very hot.


7. Turn the bag inside out, so all stitches will be inside.


8.  Now is the time to mark the spots with a pen or marker where you want the pockets for the plants .   You  can make them the way you see on the picture, or any way you want it.  The amount of pockets will depend as well on what you want to plant.  Some plants need more space, some need only a little bit.  Basically you can make one raw of holes in front of the bag and two on the sides.  Leave the site where is the stitch as back site.


9.   Fold bag, like on the picture below. 


10.   Make cuts in the places where the pockets are going to be.  As you go along melt cuts straight after cut, so the bag won’t rip apart.


11.   Now your bag is ready. 


PART 2 COMING SOON.  

Friday, April 6, 2012

How to blow egg shell making one hole

Easter is one of those occasions when most of the people buy or make some decorations.
I remember when I was a small girl, with my mum and sisters we usually made egg shell decorations by ourselves.... Great fun for kids...   
One of the advantages of using empty egg-shell is that you can keep Easter decorations at home for a longer time without worrying that eggs will go off...
The most popular way of getting empty egg shells is by making two holes and blowing the egg content out.
Today I would like to show you a way to do the same but with only one hole.

You will need:
      -  Raw egg
      -  Pen or pencil
      -  Small knife with pointed tip
      -  Straw

     And this is how it goes:

Step 1.  Get your egg ready. Make sure it is clean.  
You can get rid of stamp marks using sponge and vinegar.


Step 2.  Mark spot where you want to make a hole.  
If you feel confident, you can skip it.  It just makes it easier for beginners :)


Step 3. Using knife tip, make a hole... 
The hole should be about 1 cm long


Step 4.  Put one end of the straw into the egg and simply blow it. 
Make sure that there will be about 0,5 cm free space beside the straw, so the egg content can come out easily. 
Remember to keep egg with the hole facing down and over bowl.


This is what you should get.  I always rinse out the egg shell with water.  
To get water quicker out you can use straw again.


This is still the same egg shell - looking at the other side ;)


After that you can decorate your eggs the way you want it.  Paint it, colour it or just get ready 'jackets' like those you can see below.


HAPPY EASTER!!! 


Tuesday, April 3, 2012

Finally got started


Finally. . .

I finally managed to start my blog. . .
I guess this place will be kind of mix of my passions*. . .   Photography, Cooking and Gardening.
Free from politics, news from all over the World etc.  Just kind of Happy Place.  At least that’s the plan.
For start I would like to share with you some pictures which I took some time ago - mostly in Co. Mayo.
I hope you will enjoy it. . .


 * - not including my beloved Family